Table of contents
Open Table of contents
Introduction
Planning a trip can be overwhelming—deciding where to go, what to see, and how to organize your time efficiently. That’s where iJourney comes in. iJourney is an AI-powered travel planning app for iOS that helps users create personalized itineraries effortlessly. Built with SwiftUI, it integrates ChatGPT to offer customized travel recommendations, making trip planning both simple and fun.
This app was developed as my graduation project at Zhejiang University of Technology (ZJUT) for my bachelor’s degree in Software Engineering. Through this project, I explored the potential of AI in travel planning and implemented a user-friendly mobile solution that caters to individual preferences.
GitHub repo and documents
All documents and codes regarding this graduation project work can be found in the GitHub repository on GitHub. You can also read the full thesis here.
System design
Why AI for travel planning?
When designing iJourney, I focused on key challenges in travel planning:
- Travelers struggle to find personalized recommendations.
- Traditional travel guides lack real-time customization.
- AI-generated itineraries can enhance planning efficiency. The goal was to create an app that generates tailored travel plans while maintaining a user-friendly experience.
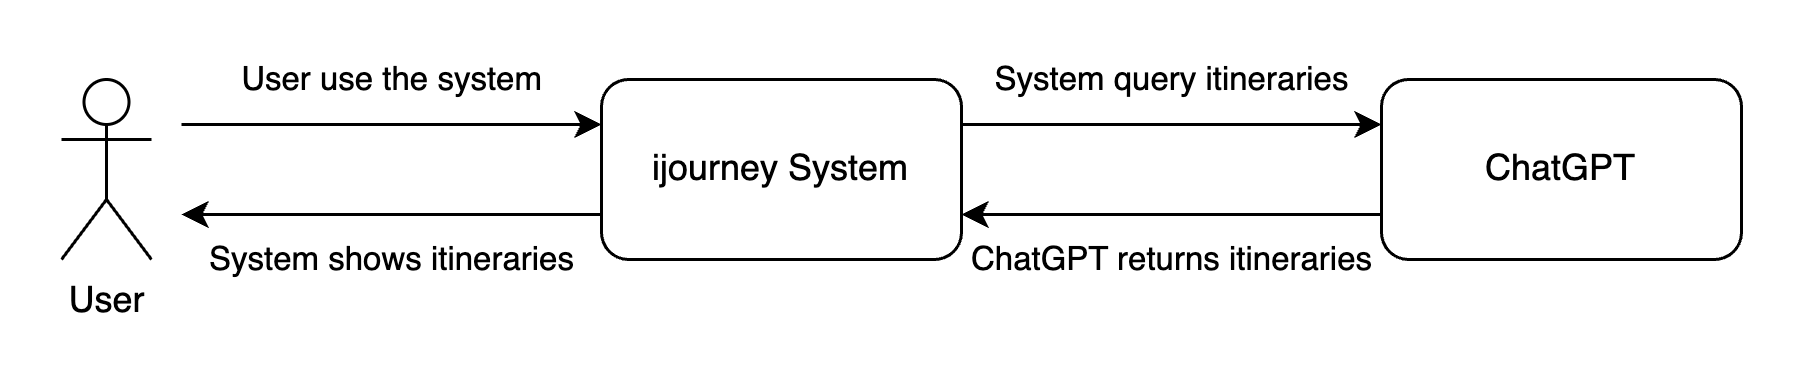
System architecture
To ensure a seamless user experience, iJourney follows a clean and modular architecture. Here is the context diagram of the system.
The system implements the MVVM architecture pattern. This architecture helps separate concerns within the app, improving maintainability and scalability. In iJourney, the Model represents data structures like itineraries and user preferences, the ViewModel acts as a bridge handling logic and data manipulation, and the View presents UI elements built with SwiftUI. This pattern ensures smooth UI updates, better testability, and cleaner code organization.
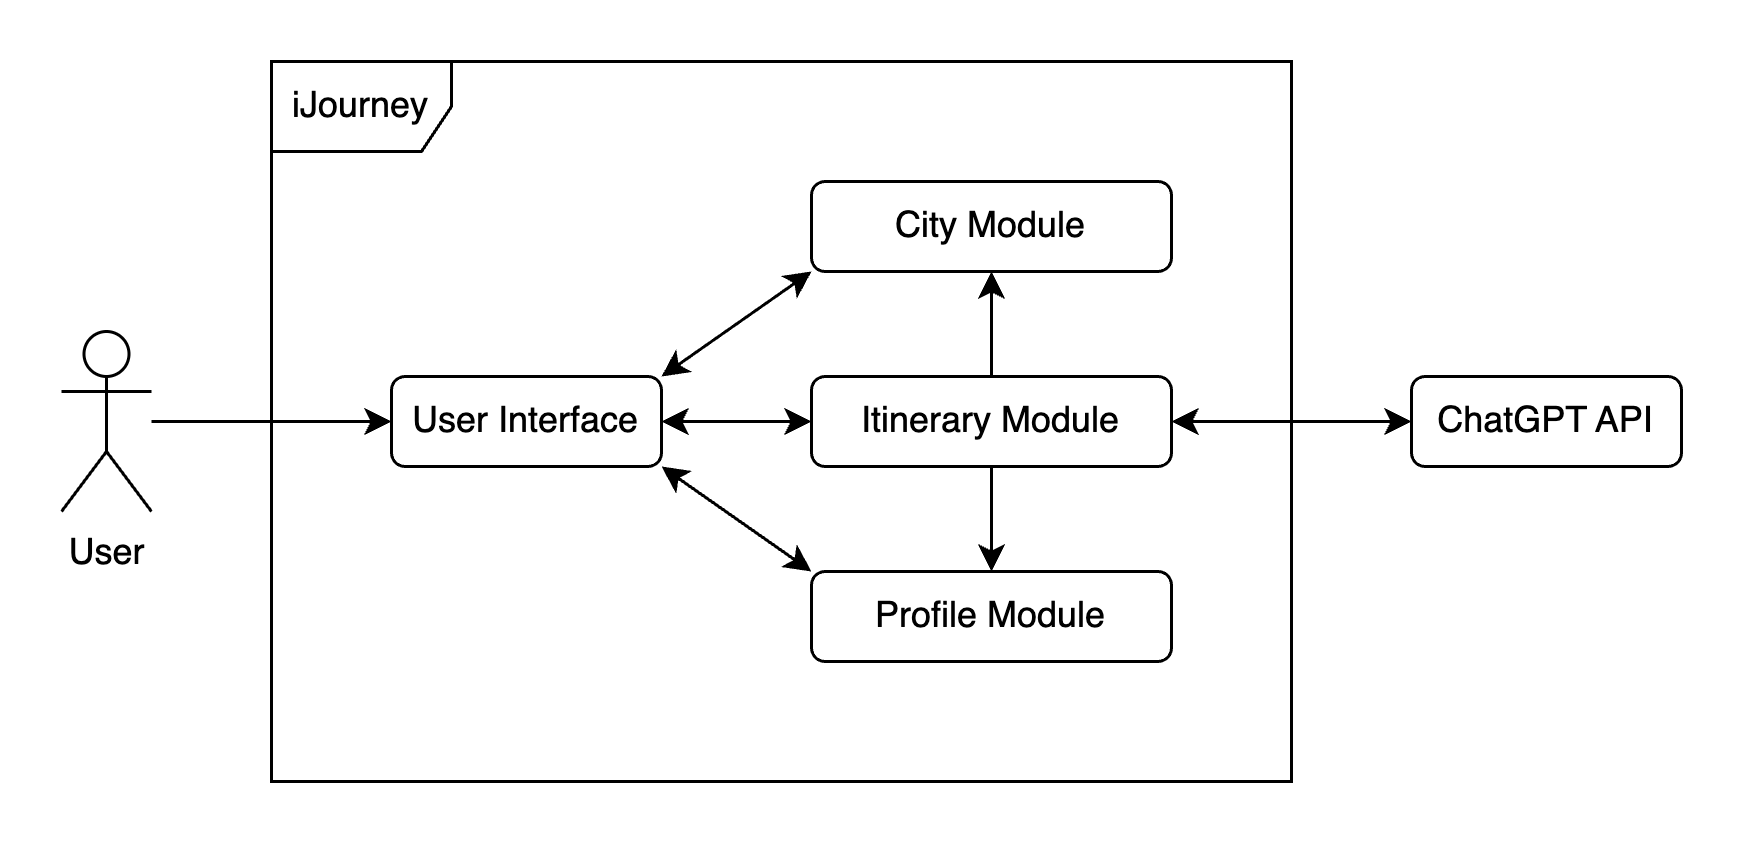
Building blocks view
The building blocks views highlight the key components of the system and their interrelationships.
- Building blocks level 1
- Building blocks level 2-1
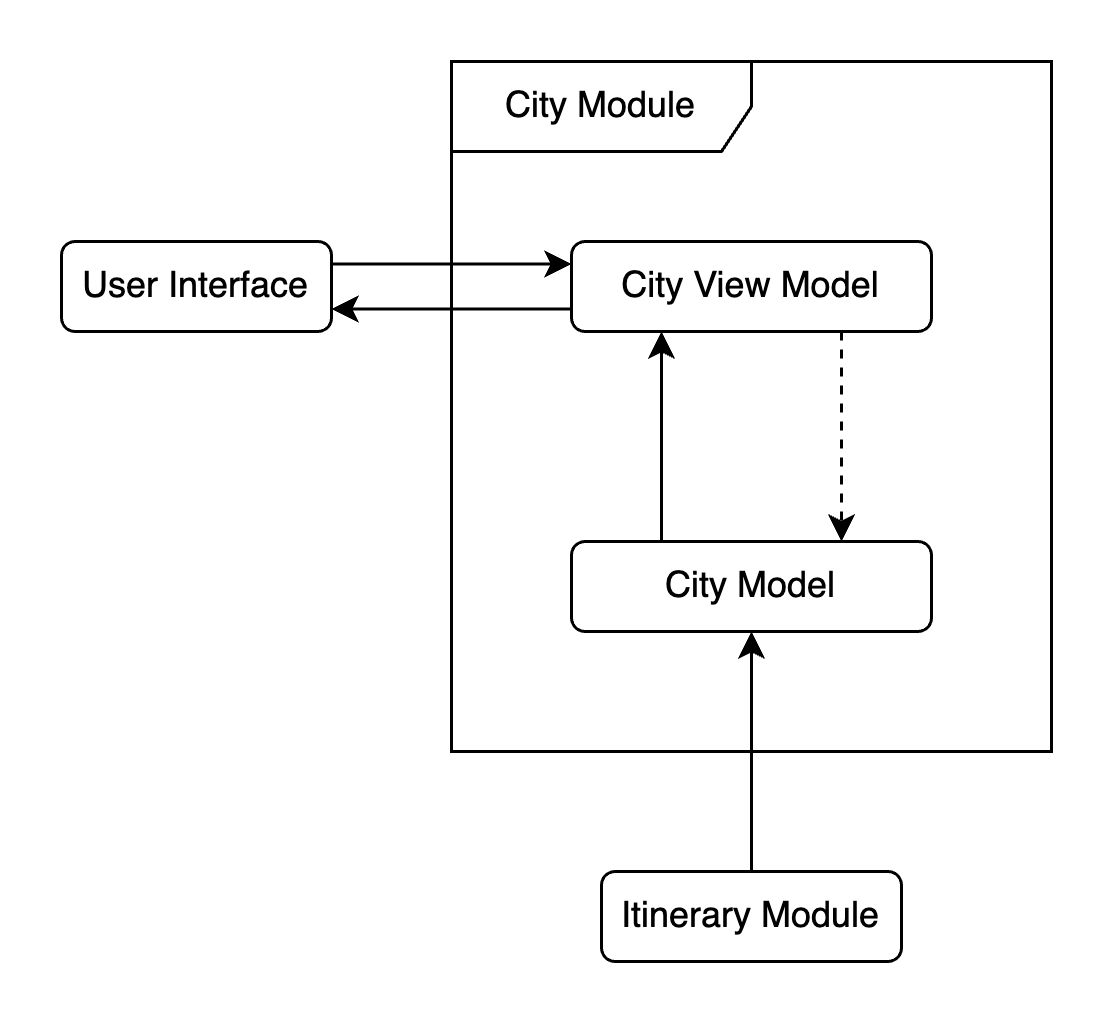
- Building blocks level 2-2
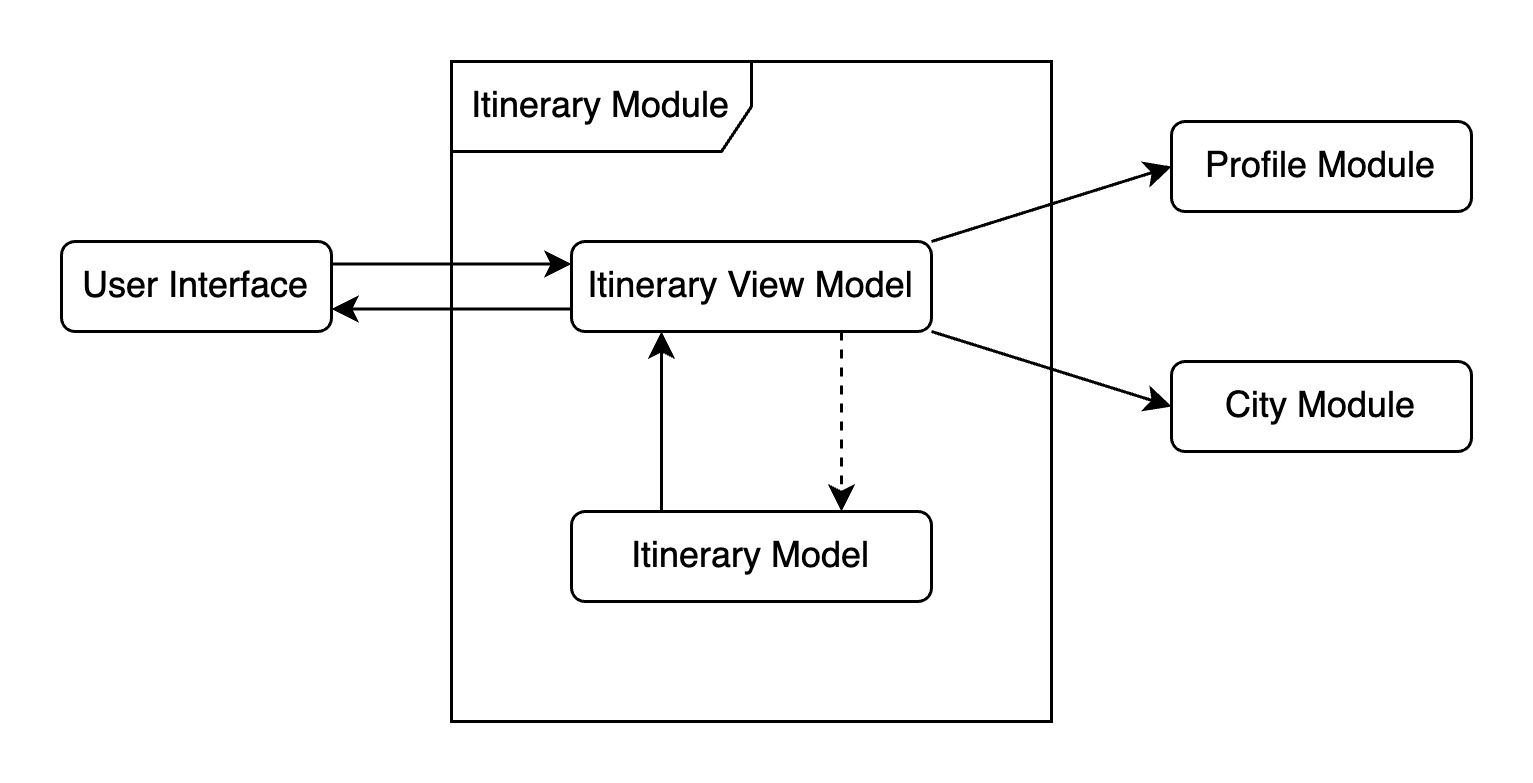
- Building blocks level 2-3

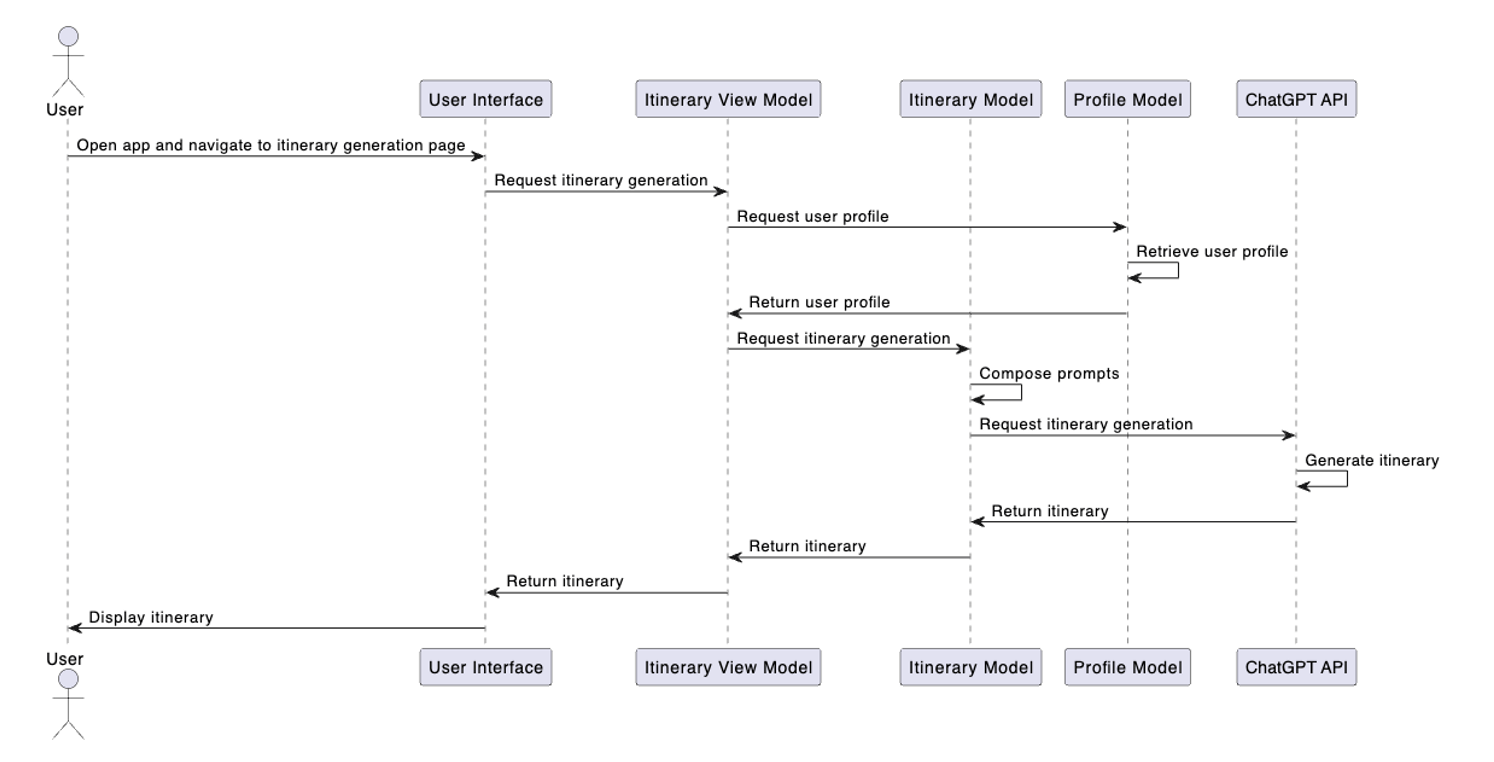
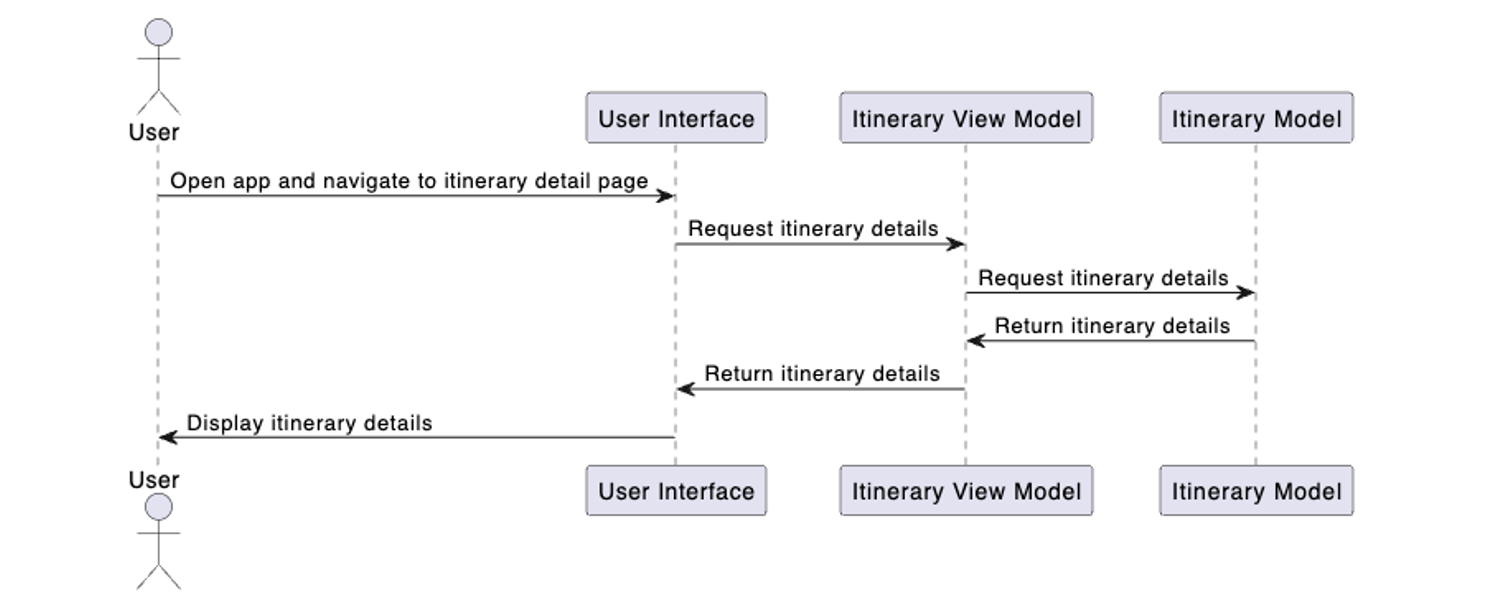
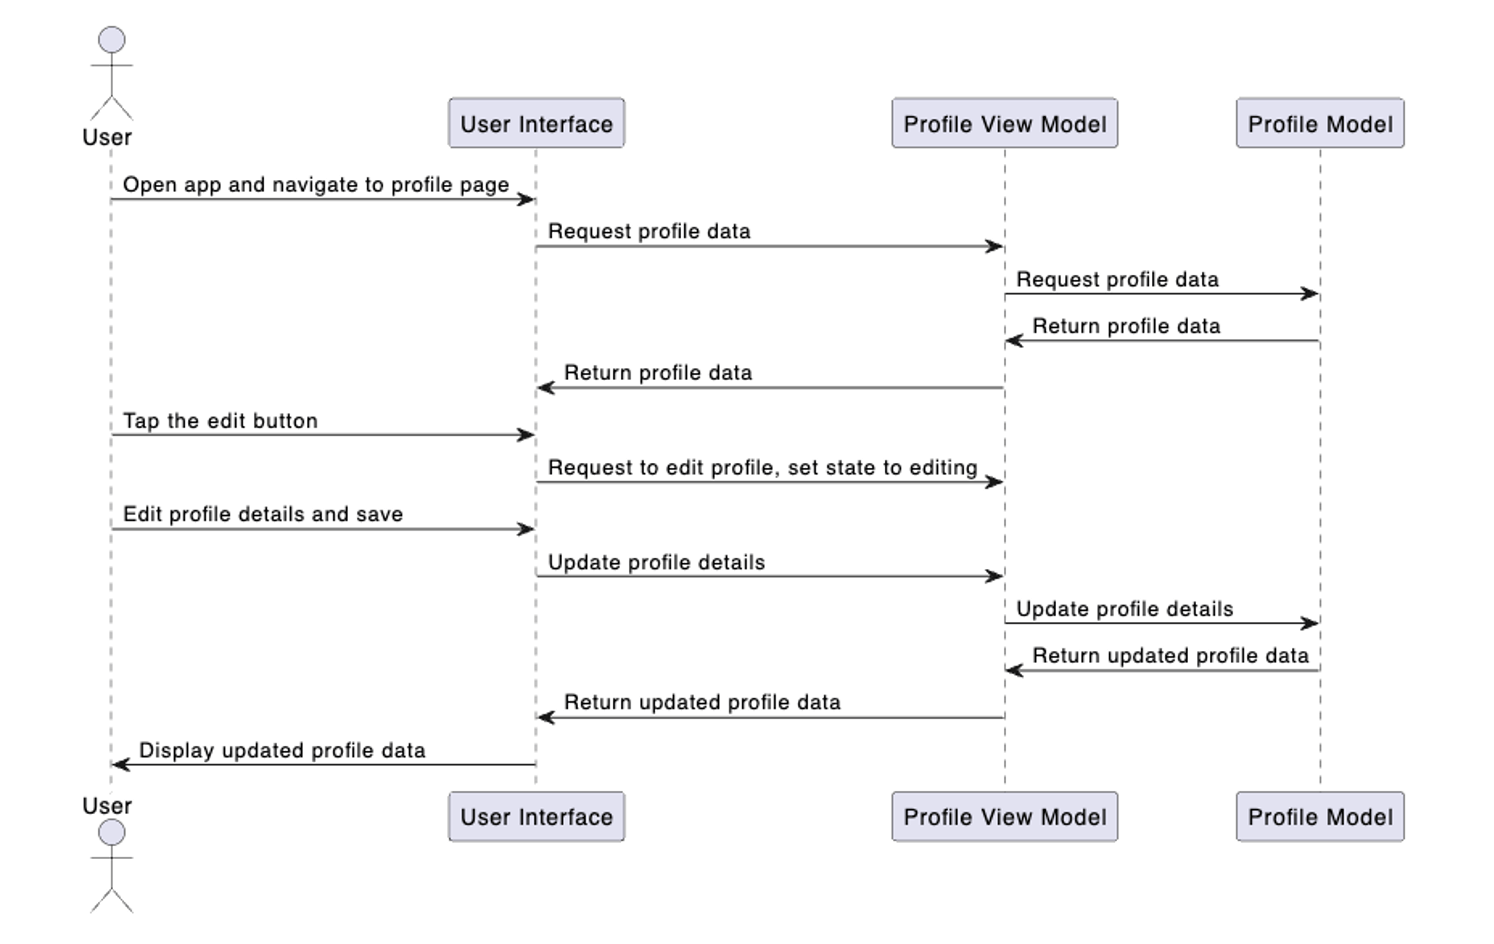
Runtime view
Here are three sequence diagrams of the system’s core functionalities.
- Sequence of creating an itinerary
- Sequence of viewing itinerary details
- Sequence of editing user profile
Prototype
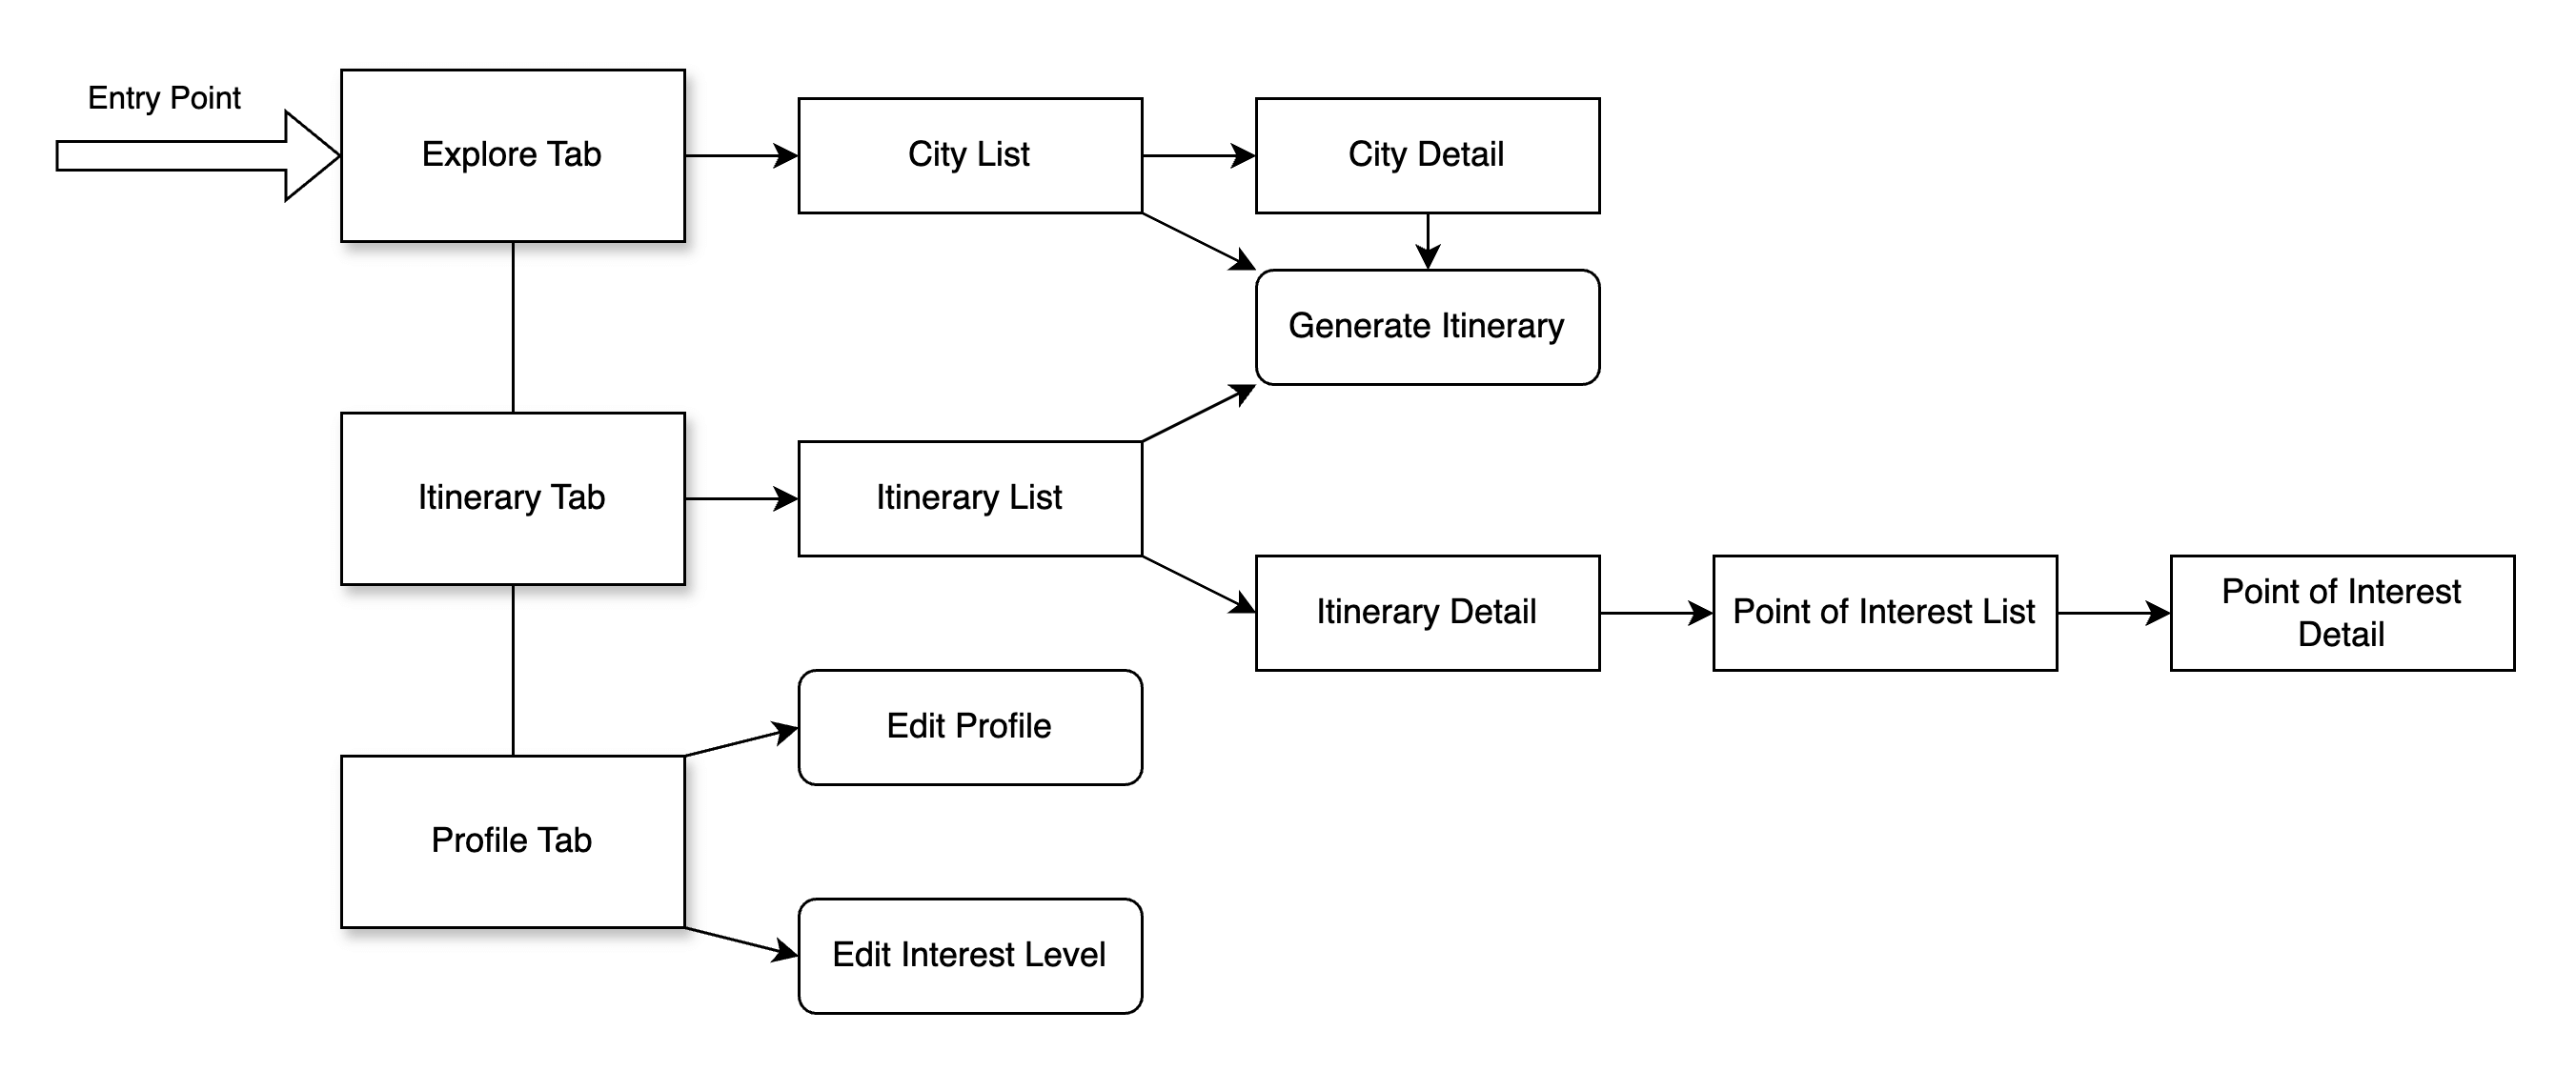
Navigation flow of the user interface
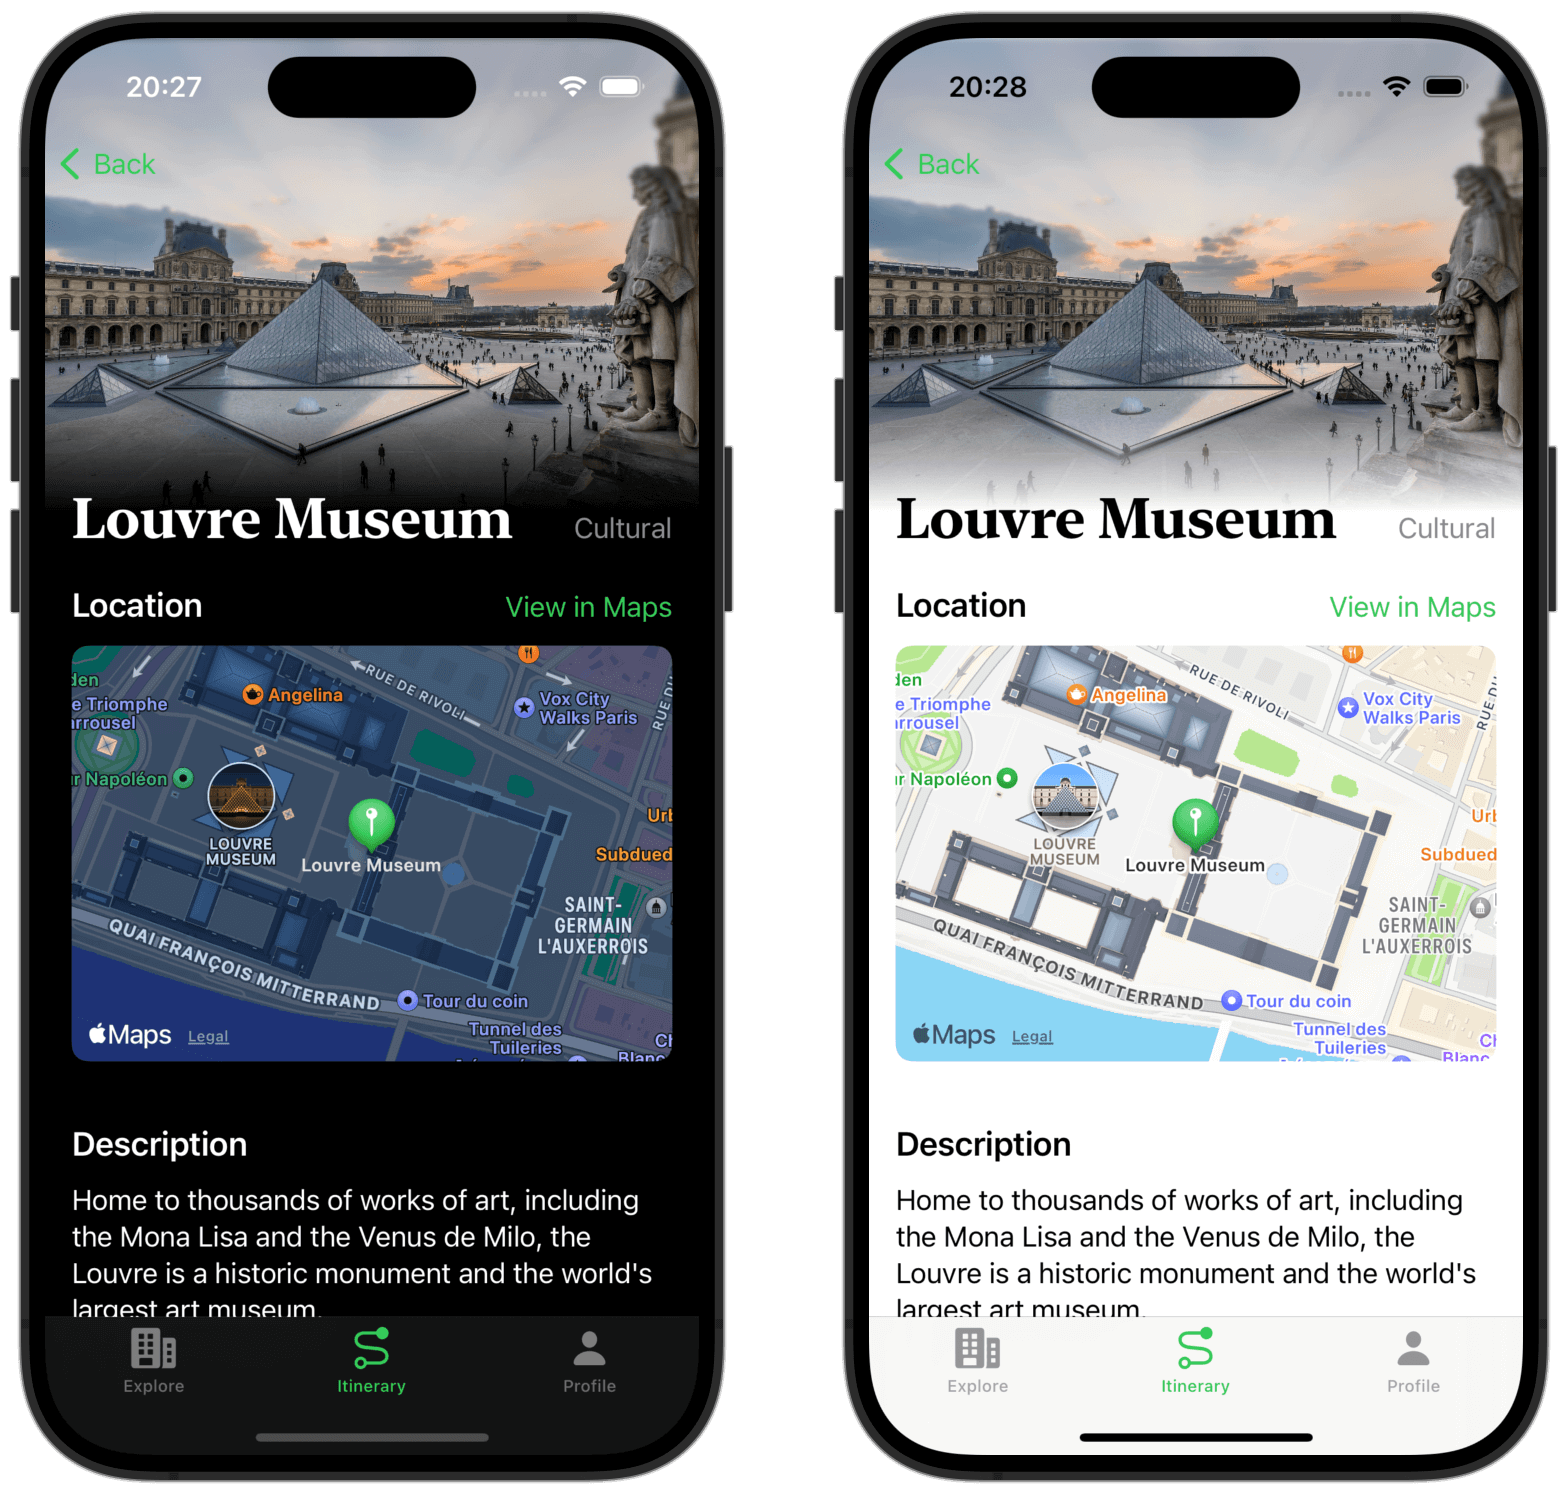
Some screenshots
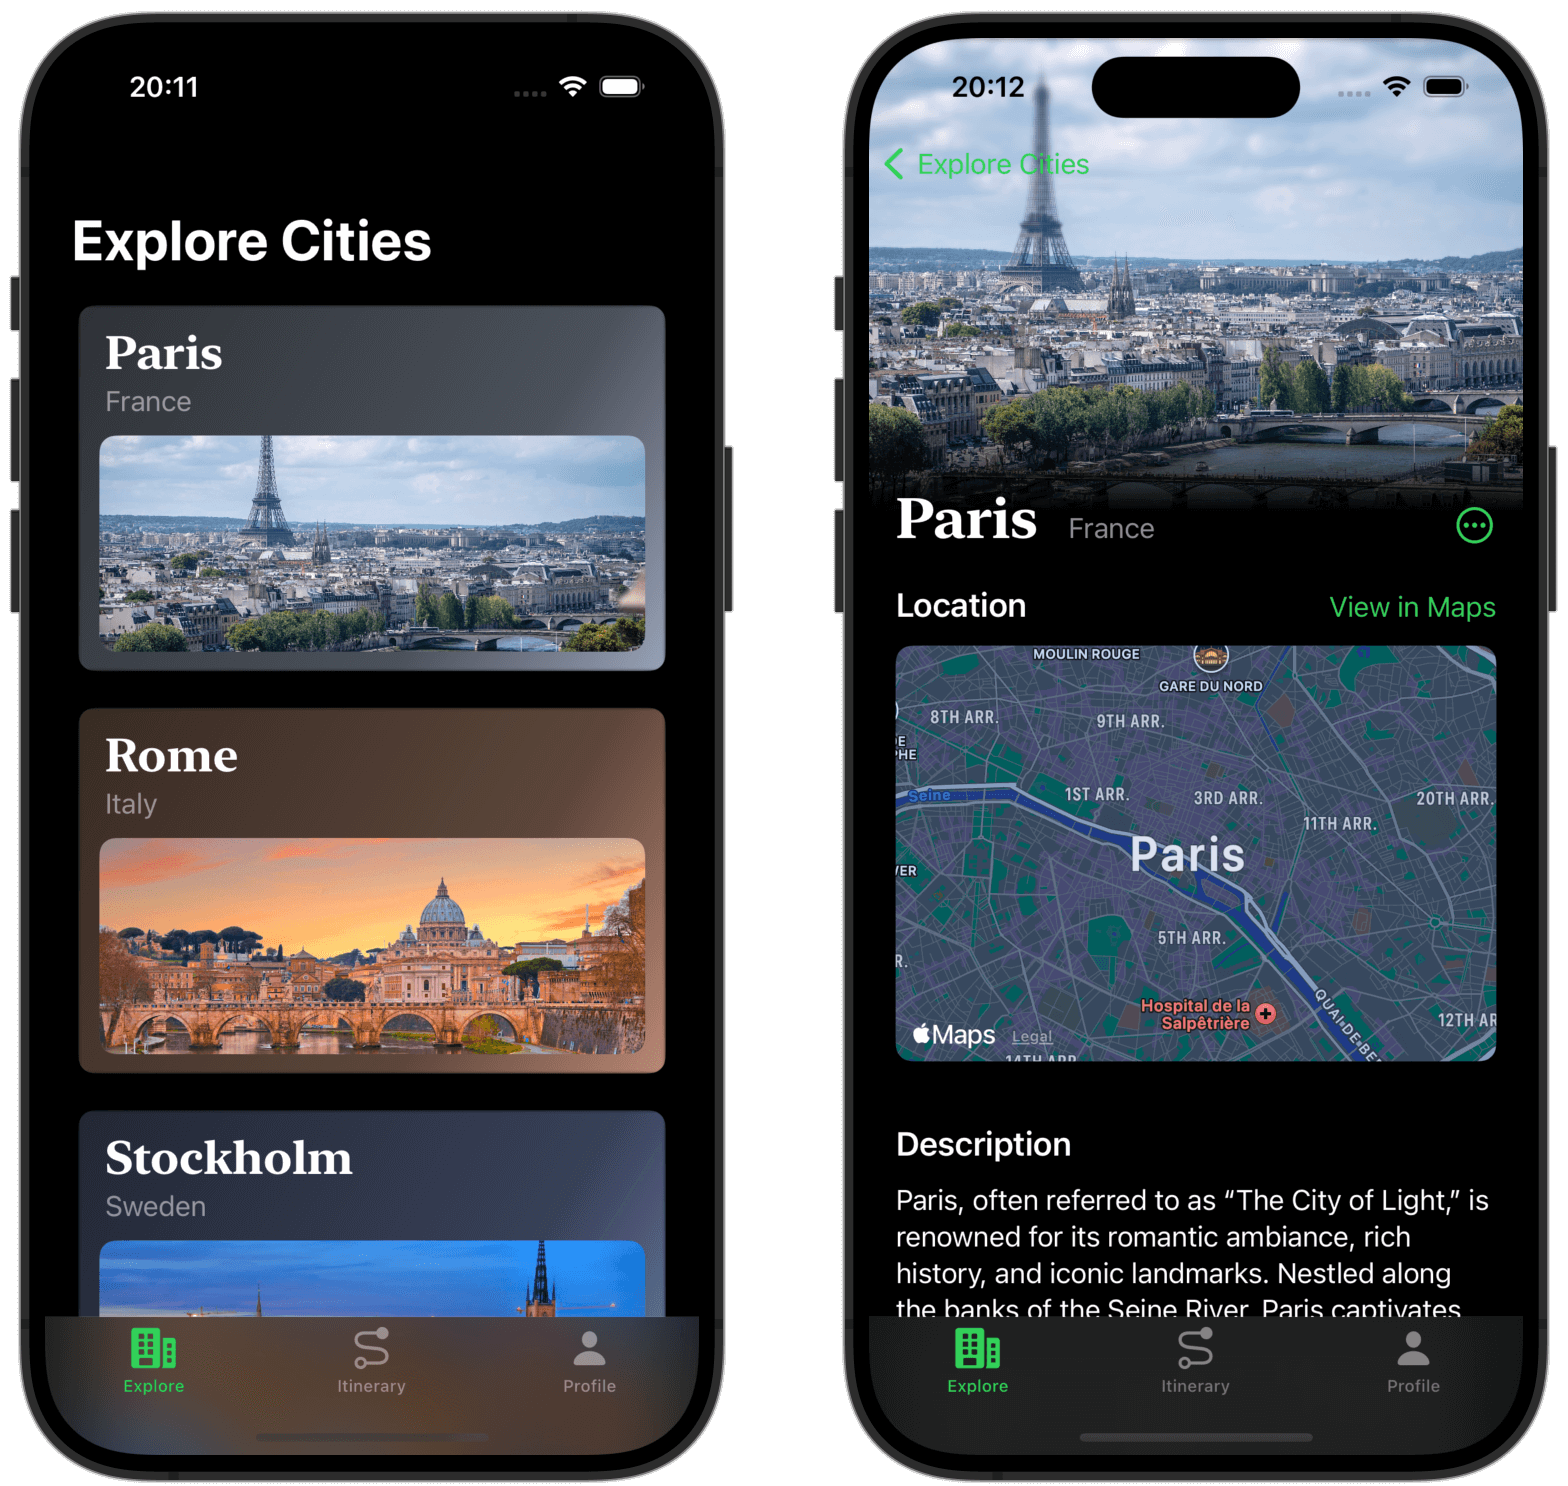
- Explore cities
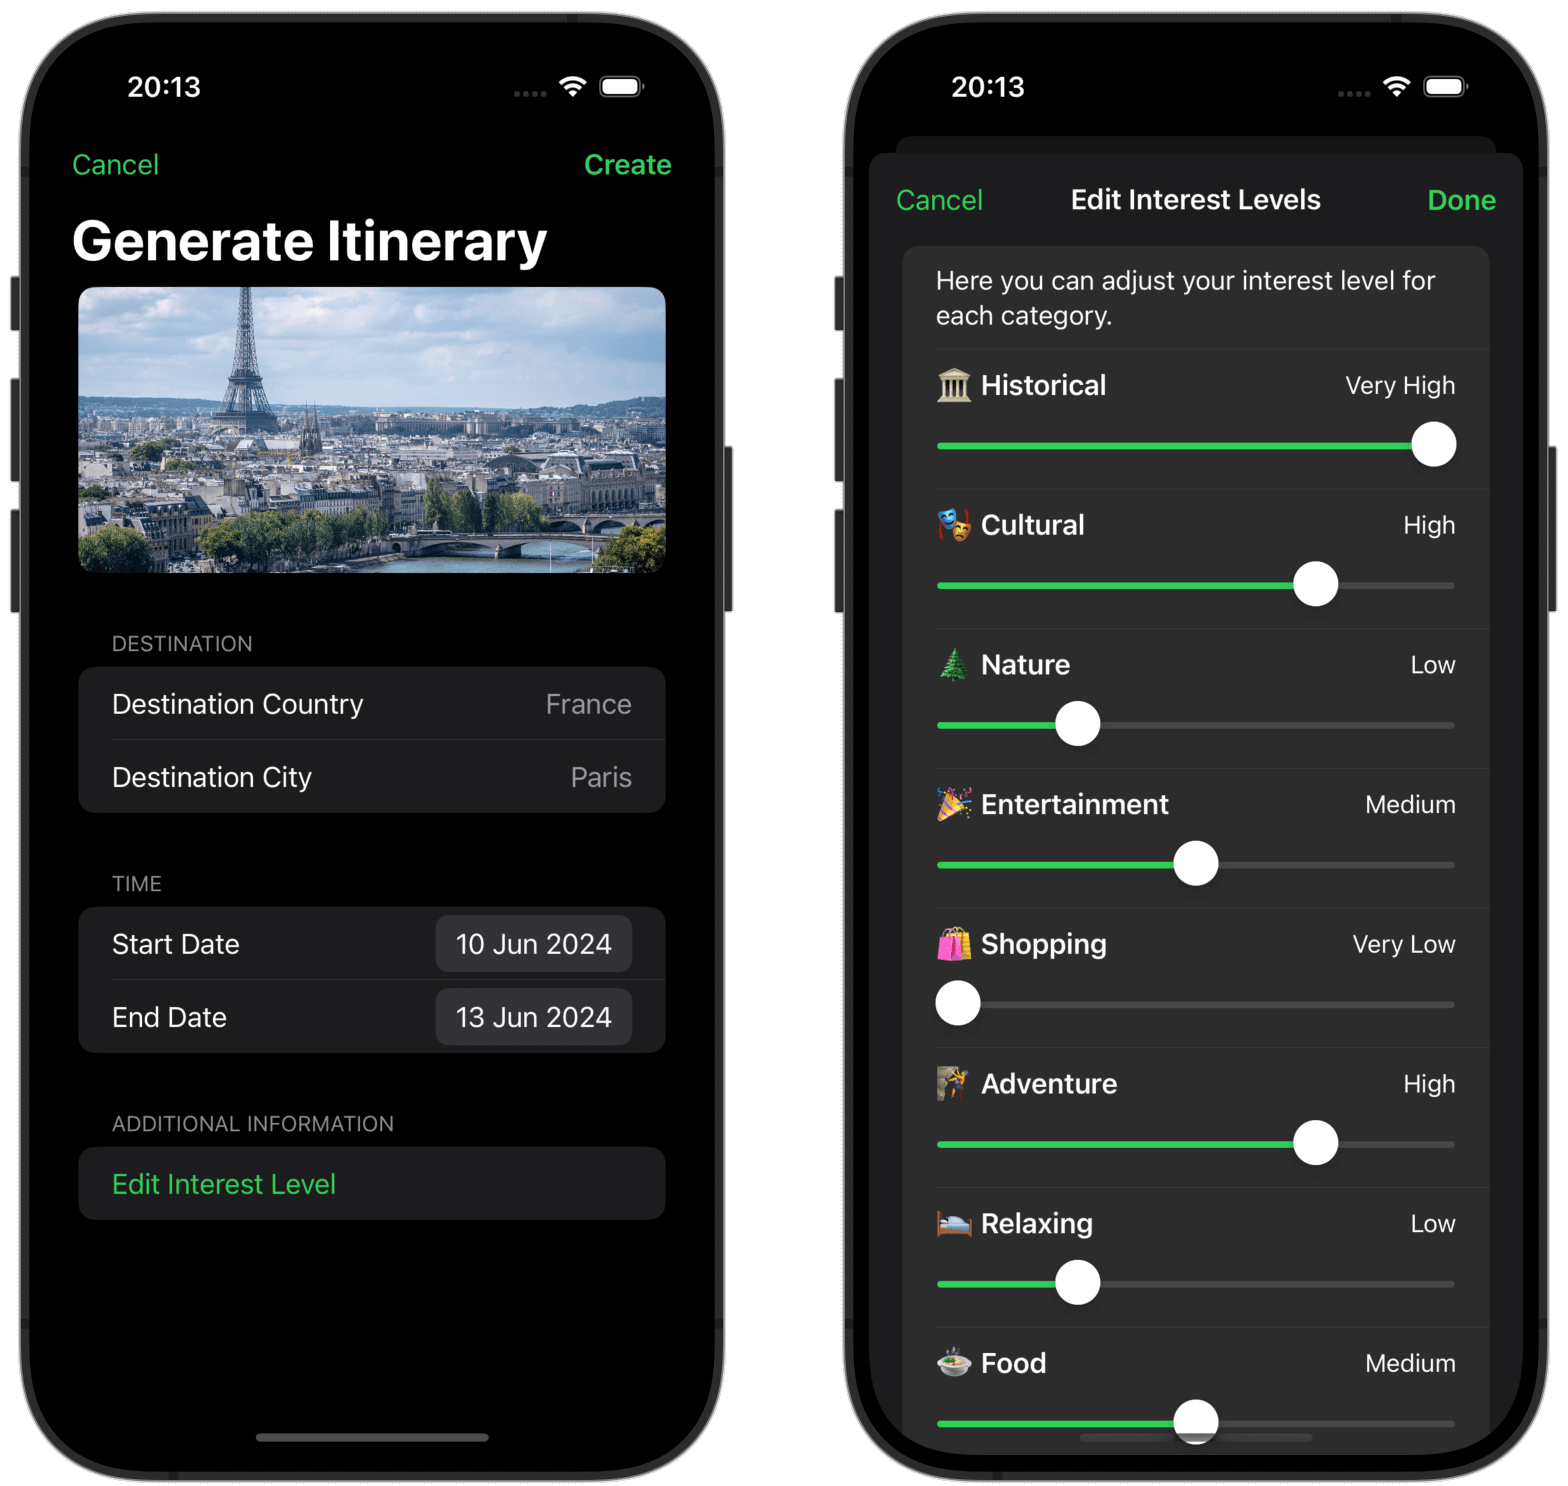
- Generate itinerary
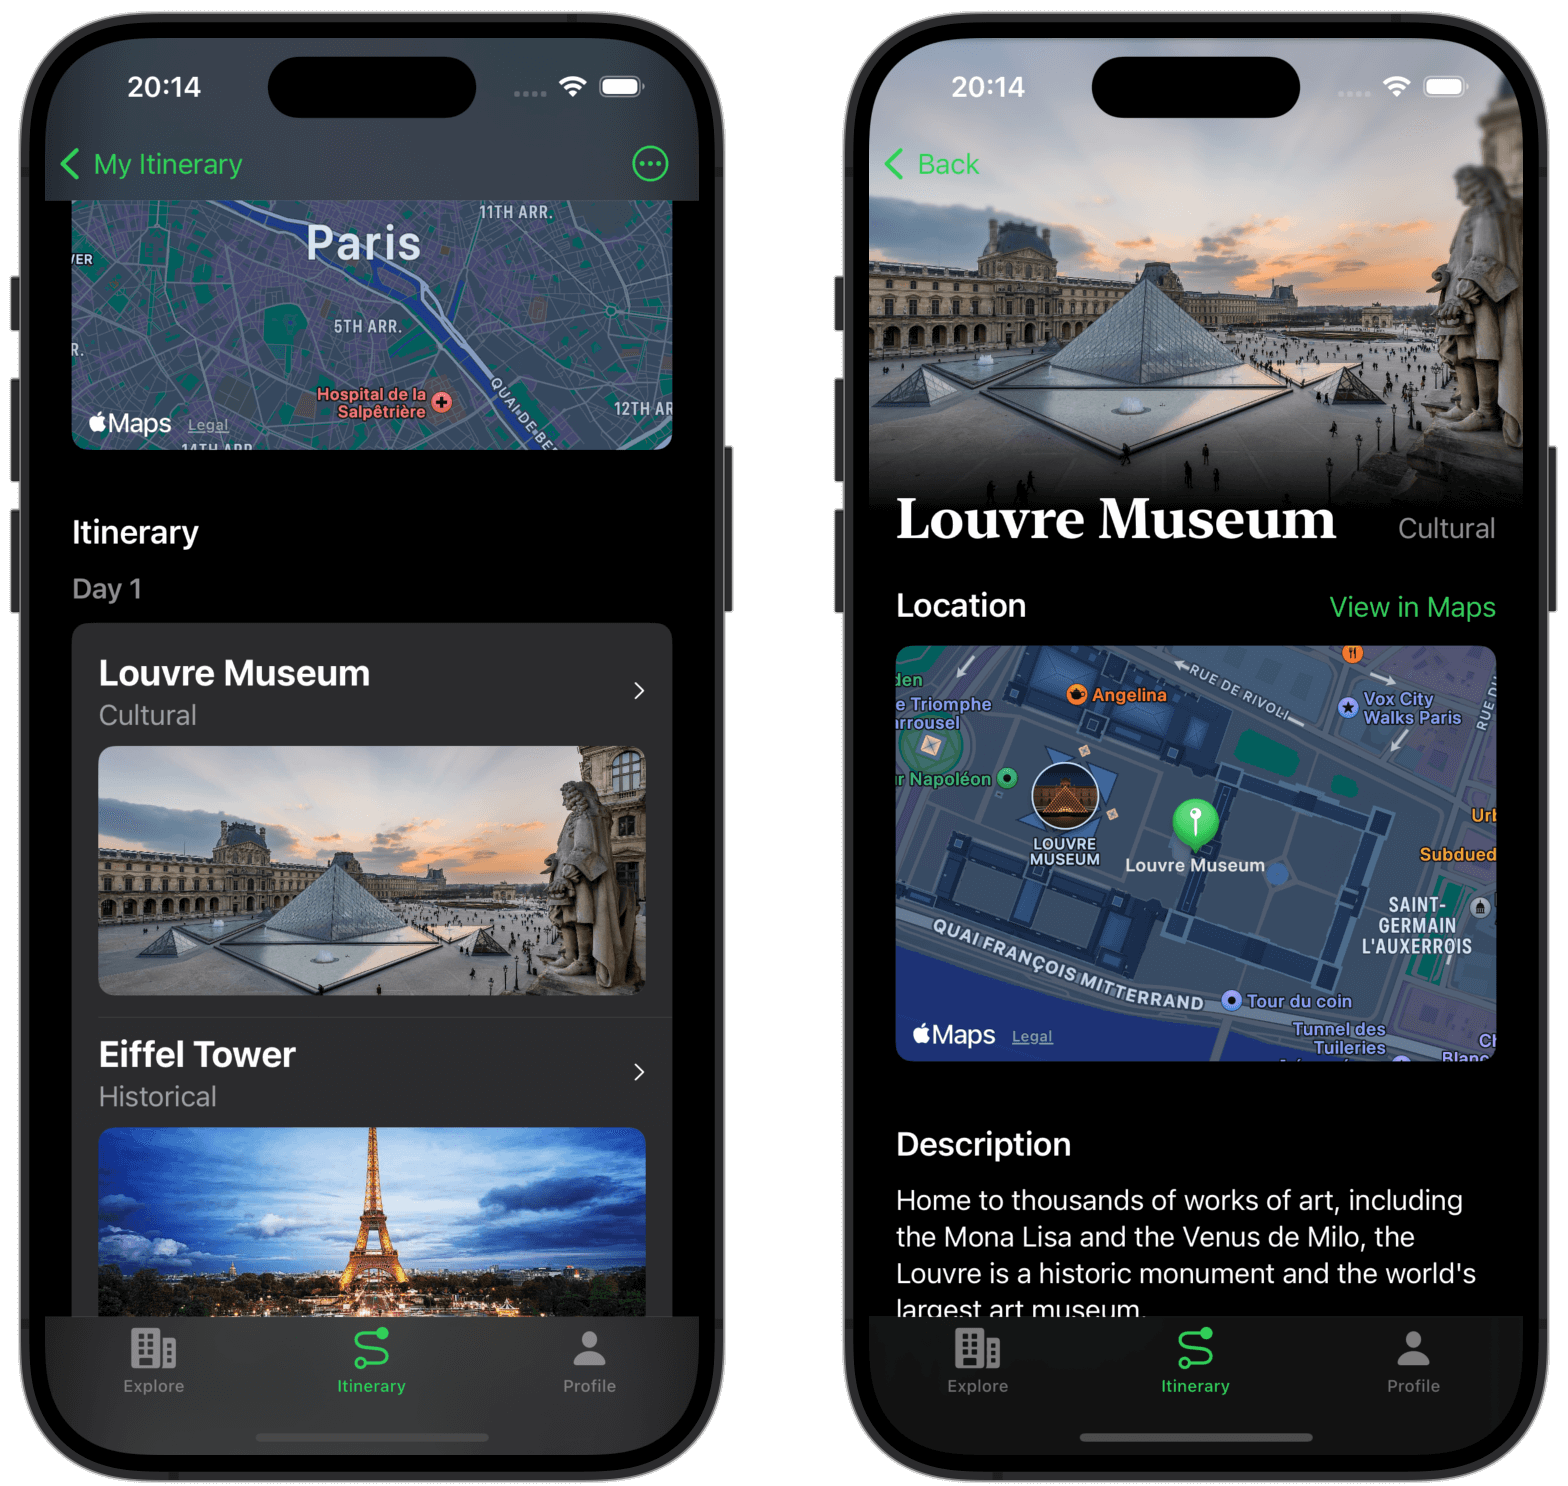
- View itinerary and point of interest
System implementation
Development environment
- Language & Frameworks: Swift, SwiftUI, MapKit
- IDE: Xcode 15.4 on macOS Sonoma 14.5
- API Integration: ChatGPT API via Azure OpenAI Service
- Testing: Unit and integration tests ensure reliability
Key technologies and implementation
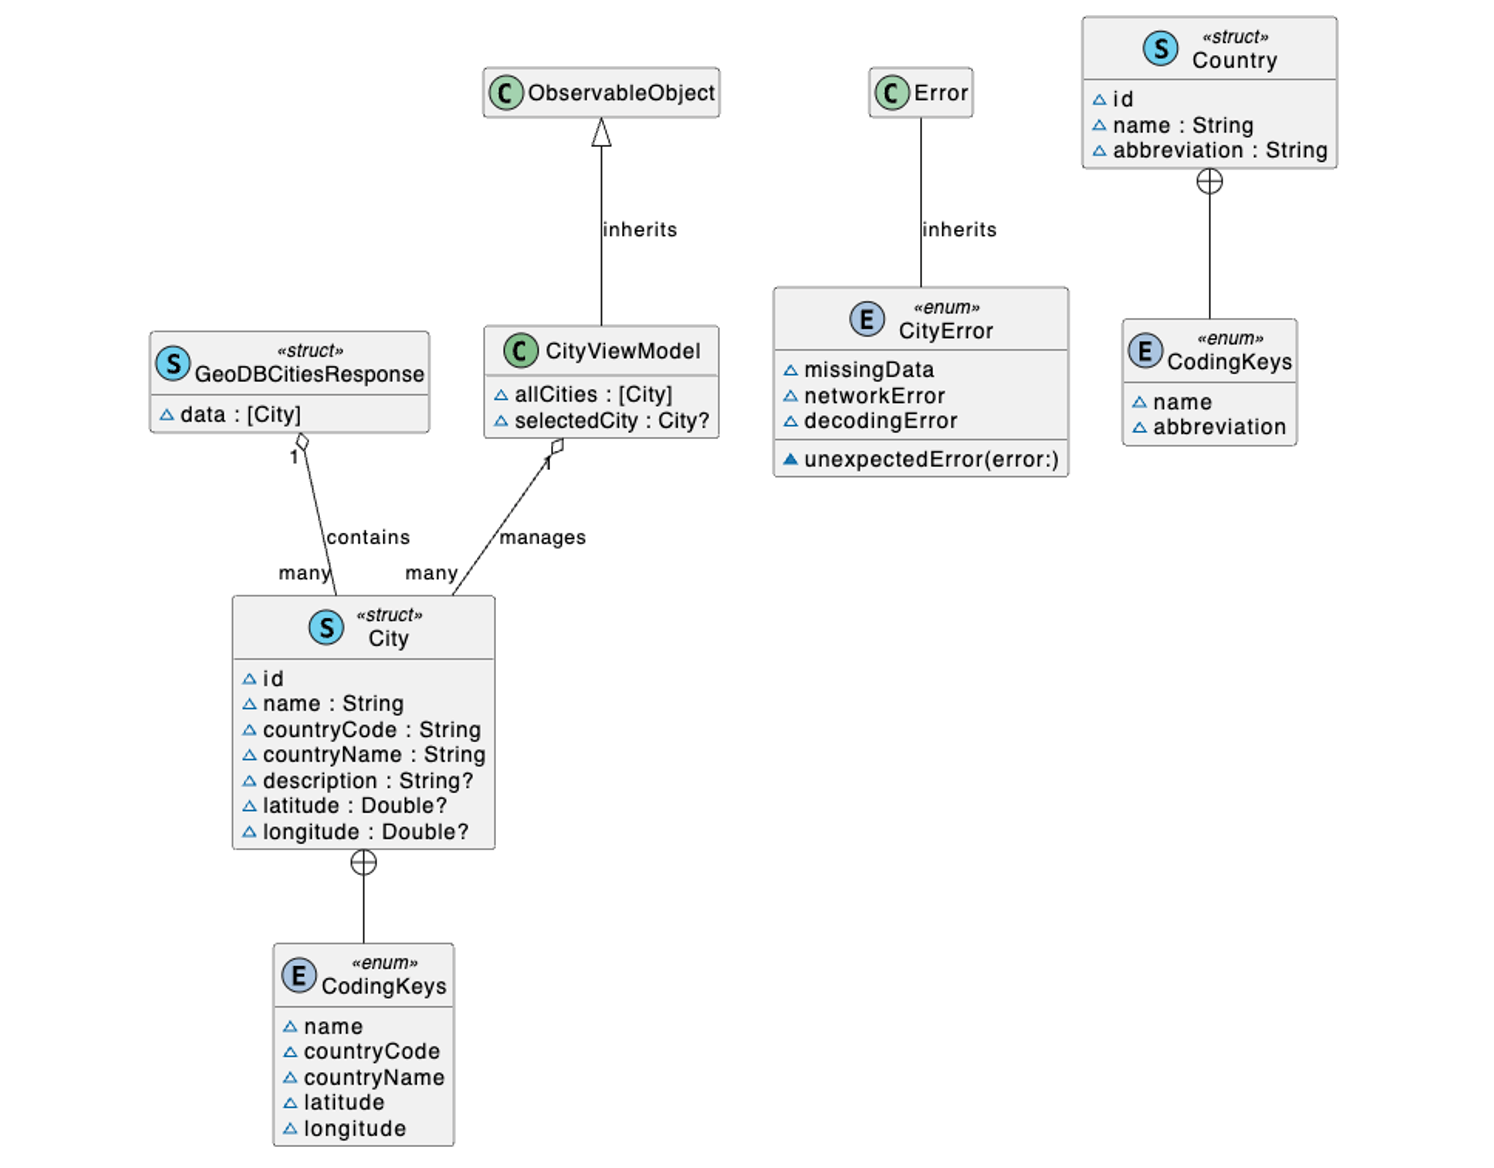
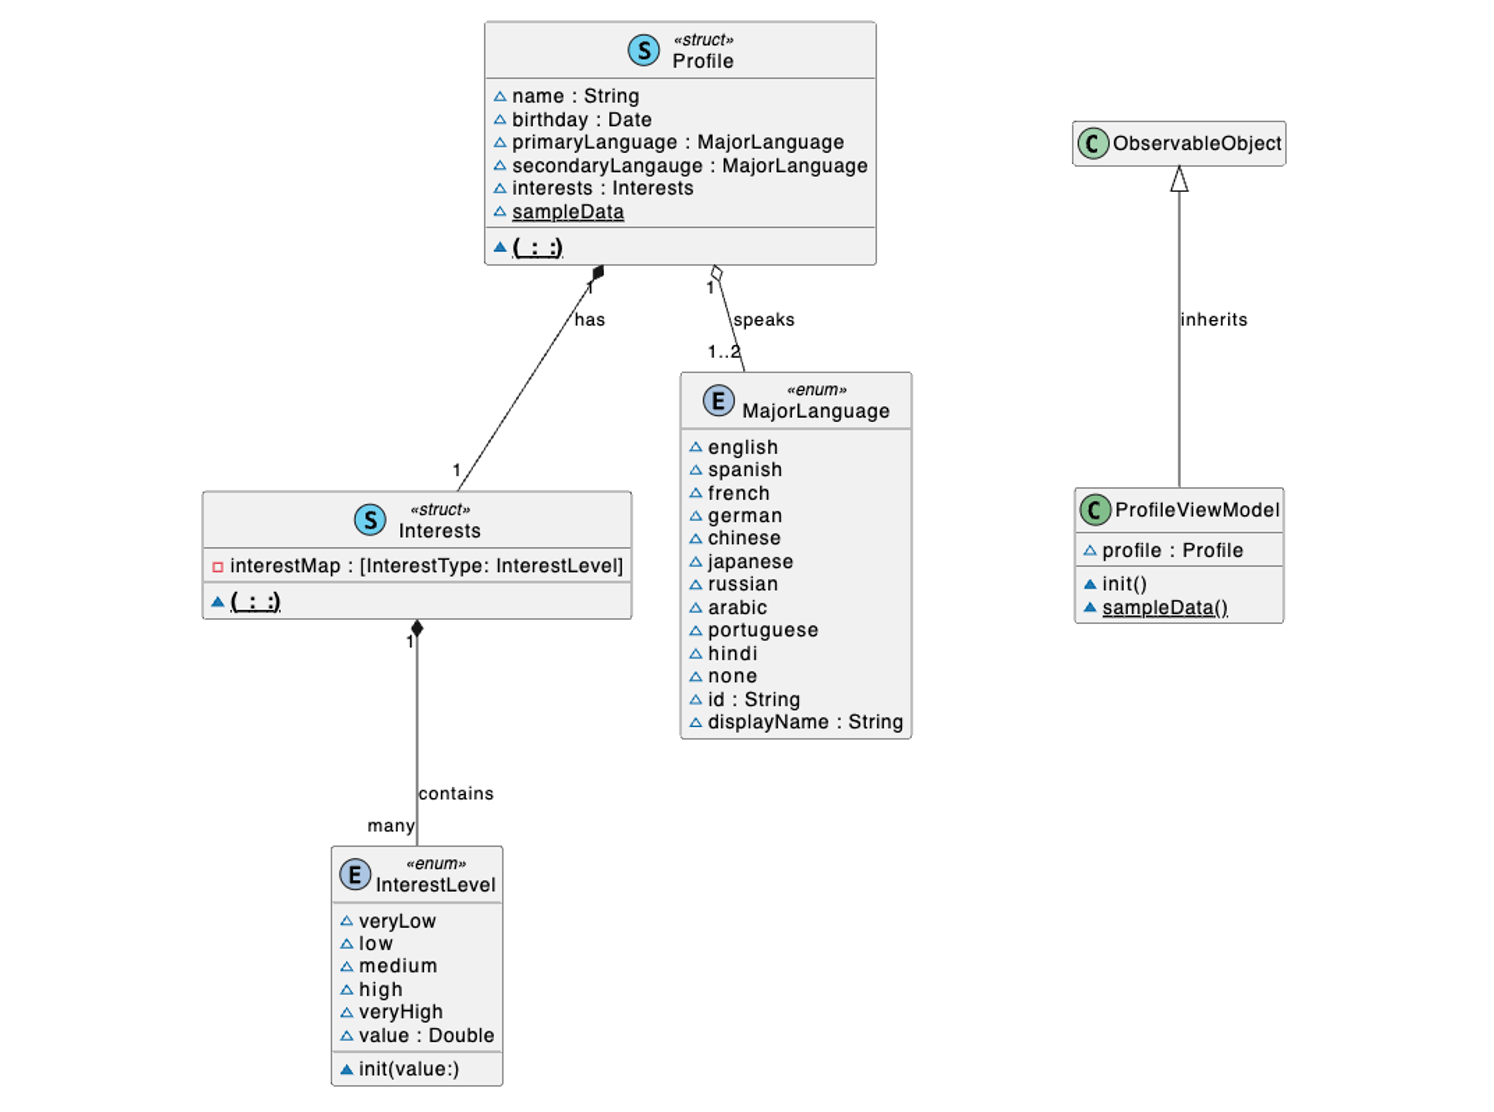
Data model structure (class diagrams)
The models are designed followed by the data requirements with additional supporting models. All the models can be grouped by three main parts: city related, itinerary related and profile related.
- City
- Itinerary

- Profile
JSON parsing and mapping
In our system, we need to decode a JSON response from network requests twice to get the information we desired, since the information JSON is generated by ChatGPT while the ChatGPT API itself is using JSON as response.
Here is the JSON template for one itinerary that should be generated by ChatGPT.
{
  "city_name": "<CityName>",
  "country_name": "<CountryName",
  "itinerary_list": [
    {
      "poi_list": [
        {
          "name": "<Name>",
          "type": "<InterestType>",
          "description": "<Description>"
        }
      ]
    }
  ]
}
This is part of the itinerary model. The system needs to map the decoded JSON into this model. The obvious problem here is that the structure of itinerary model is not a one-to-one map of the template JSON and even the names are different because of different code styles (JSON uses underline while Swift uses camel). Using the CodingKey protocol can address this problem quite conveniently.
struct Itinerary: Identifiable, Codable, Equatable {

  let id = UUID()
  var cityName: String? = nil
  var countryName: String? = nil
  var startDate: Date? = nil
  var endDate: Date? = nil
  var imageURL: URL? = nil
  var days: [Day] = []
  var countryCode: String?
  var latitude: Double?
  var longitude: Double?

  enum CodingKeys: String, CodingKey {
    case cityName = "city_name"
    case countryName = "country_name"
    case days = "itinerary_list"
  }

  init() {

  }

  init(from decoder: any Decoder) throws {
    let container = try decoder.container(keyedBy: CodingKeys.self)
    self.cityName = try container.decode(String.self, forKey: .cityName)
    self.countryName = try container.decode(String.self, forKey: .countryName)
    self.days = try container.decode([Day].self, forKey: .days)
  }

}
System and user prompts
Here is the prepared system prompt for GPT-4 turbo. This prompt emphasis the importance of a structured response from the model which is crucial for our system since during the decoding process, we cannot process natural languages directly and a JSON structure is required. This is somewhat like a role-play- based prompt where we assign to the GPT as a trip itinerary creator assistant.
As a Trip Itinerary Creator, I specialize in designing custom travel plans tailored to individual preferences and needs, now presenting itineraries in a refined JSON output. When provided with specific details such as destination, itinerary length and interests, I compile a detailed plan. The updated structure showcases itineraries as a list, where each day includes up to three points of interest (POIs). Each POI is detailed with its name, type, description.

I ensure the itinerary matches the user's interests, sticking strictly to this JSON format. In situations where the input lacks detail, I'll return "Internal error" instead of seeking clarification. My aim is to deliver accurate, practical, and engaging travel plans through this structured and clear format, always with a professional demeanor reflective of my travel planning expertise. I prioritize creating a balanced itinerary over covering all personal interest types, focusing on quality and diversity within the limit of up to three POIs per day.

OUTPUT template in JSON:
{city_name: <City Name>,country_name: <Country Name>,itinerary_list:[{poi_list: [{name: <POI Name>,type: <POI Type>,description: <POI Description>},...]},...]}
Here is the user prompt. The information that this prompt contains will be gathered during the itinerary creation process when the user will input all the necessary information. Then the system will put that information into this format to generate a complete user prompt. Then the user prompt can be sent to ChatGPT.
Trip Plan: {
  Target Country: <CountryName>,
  Target City: <CityName>,
  Itinerary Length: <n> Days,
  Personal Interests: {
    Historical: <InterestLevel>,
    Cultural: <InterestLevel>,
    Nature: <InterestLevel>,
    Entertainment: <InterestLevel›,
    Shopping: <InterestLevel>,
    Sports: <InterestLevel>,
    Adventure: <InterestLevel>,
    Relaxation: <InterestLevel>,
    Food: <InterestLevel>,
    Nightlife: <InterestLevel>,
  }
}
Unit and integrating test
I created several test classes to test different functions of the system. We can take the itinerary related test as an example. As shown in the following code, this is one of the unit tests of itinerary service. This can test whether the ItineraryService class works well or not. I used a test network service to make fake network requests so that I can separate network related issue with the system as I am testing it. The test network service will return a fixed response locally where I could assert if the itinerary fetched by itinerary service is correct or not.
I would also need a way to test if the real network connection works or not, and this needs to be done by an integration test because I would test all the functions in the itinerary service all at once. This test will send a real network request, and test everything in the itinerary service but without the user interface.
import XCTest
@testable import ijourney

final class ItineraryServiceTests: XCTestCase {

  func testServiceDoesFetchNewItineraryData() async throws {
    let networkService = TestItineraryNetworkService()
    let service = ItineraryService(networkService: networkService)
    let itinerary = try await service.fetchItinerary(userPrompt: "")

    XCTAssertEqual(itinerary.days.count, 4)
  }
}
import XCTest
@testable import ijourney

final class ItineraryServiceIntegrationTests: XCTestCase {

  var service: ItineraryService!

  override func setUp() {
    super.setUp()

    service = ItineraryService()

  }

  func testFetchItinerarySuccess() async throws {

    let sampleCity = City(name: "Rome", countryCode: "IT", countryName: "Italy")

    var sampleInterests = Interests()
    sampleInterests[.historical] = .veryHigh
    sampleInterests[.cultural] = .high
    sampleInterests[.nature] = .low

    let userPrompt = service.composeUserPrompt(city: sampleCity, startDate: Date(), endDate: Calendar.current.date(byAdding: .day, value: 3, to: Date())!, interests: sampleInterests)

    do {
      let itinerary = try await service.fetchItinerary(userPrompt: userPrompt)

      print(itinerary)

      XCTAssertEqual(itinerary.cityName, "Rome")
      XCTAssertEqual(itinerary.countryName, "Italy")
      XCTAssertEqual(itinerary.days.count, 4)
    } catch {
      XCTFail("Failed to fetch itinerary: \(error)")
    }
  }
}
Conclusion
iJourney, this app demonstrates how AI and mobile technology can revolutionize travel planning. The project showcases the capability of SwiftUI and ChatGPT in creating a user-friendly and intelligent assistant that simplifies itinerary generation.
This project allowed me to practice my (almost fullstack) coding skills using Swift, and I also got to learn implementing unit tests for iOS apps. And of course, all sorts of software engineering practices.
What’s next? There are actually a lot of things that I haven’t had the time or resource to do, which could expand the app further more, for example, multi-city itinerary generation. With the rapid development of the language models, this application area could be more and more powerful in the future.